25 KiB
How to create a custom Ubuntu live from scratch

This procedure shows how to create a bootable and installable Ubuntu Live (along with the automatic hardware detection and configuration) from scratch. The steps described below are also available in this repo in the /scripts directory.
Authors
- Marcos Vallim - Founder, Author, Development, Test, Documentation - mvallim
- Ken Gilmer - Commiter, Development, Test, Documentation - kgilmer
See also the list of contributors who participated in this project.
Ways of Using this Tutorial
- (Recommended) follow the directions step by step below to understand how to build an Ubuntu ISO.
- Run the
build.shscript in thescriptsdirectory after checking this repo out locally. - Fork this repo and run the github action
build. This will generate an ISO in your github account.
![]()
![]()
Terms
build system- the computer environment running the build scripts that generate the ISO.live system- the computer environment that runs from the live OS, generated by abuild system. This may also be referred to as thechroot environment.target system- the computer environment that runs after installation has completed from alive system.
Prerequisites (GNU/Linux Debian/Ubuntu)
Install packages we need in the build system required by our scripts.
sudo apt-get install \
    binutils \
    debootstrap \
    squashfs-tools \
    xorriso \
    grub-pc-bin \
    grub-efi-amd64-bin \
    mtools \
    openssl \
    sbsigntool
mkdir $HOME/live-ubuntu-from-scratch
Bootstrap and Configure Ubuntu
debootstrap is a program for generating OS images. We install it into our build system to begin generating our ISO.
-
Checkout bootstrap
sudo debootstrap \
   --arch=amd64 \
   --variant=minbase \
   focal \
   $HOME/live-ubuntu-from-scratch/chroot \
   http://us.archive.ubuntu.com/ubuntu/
debootstrap is used to create a Debian base system from scratch, without requiring the availability of dpkg or apt. It does this by downloading .deb files from a mirror site, and carefully unpacking them into a directory which can eventually be chrooted into.
-
Configure external mount points
sudo mount --bind /dev $HOME/live-ubuntu-from-scratch/chroot/dev

sudo mount --bind /run $HOME/live-ubuntu-from-scratch/chroot/run
As we will be updating and installing packages (grub among them), these mount points are necessary inside the chroot environment, so we are able to finish the installation without errors.
Define chroot environment
A chroot on Unix operating systems is an operation that changes the apparent root directory for the current running process and its children. A program that is run in such a modified environment cannot name (and therefore normally cannot access) files outside the designated directory tree. The term "chroot" may refer to the chroot system call or the chroot wrapper program. The modified environment is called a chroot jail.
Reference: https://en.wikipedia.org/wiki/Chroot
From this point we will be configuring the live system.
-
Access chroot environment
sudo chroot $HOME/live-ubuntu-from-scratch/chroot -
Configure mount points, home and locale
mount none -t proc /proc

mount none -t sysfs /sys

mount none -t devpts /dev/pts

export HOME=/root

export LC_ALL=C
These mount points are necessary inside the chroot environment, so we are able to finish the installation without errors.
-
Set a custom hostname
echo "ubuntu-fs-live" > /etc/hostname -
Configure apt sources.list
cat <<EOF > /etc/apt/sources.list deb http://us.archive.ubuntu.com/ubuntu/ focal main restricted universe multiverse deb-src http://us.archive.ubuntu.com/ubuntu/ focal main restricted universe multiverse deb http://us.archive.ubuntu.com/ubuntu/ focal-security main restricted universe multiverse deb-src http://us.archive.ubuntu.com/ubuntu/ focal-security main restricted universe multiverse deb http://us.archive.ubuntu.com/ubuntu/ focal-updates main restricted universe multiverse deb-src http://us.archive.ubuntu.com/ubuntu/ focal-updates main restricted universe multiverse EOF -
Update indexes packages
apt-get update -
Install systemd
apt-get install -y libterm-readline-gnu-perl systemd-sysvsystemd is a system and service manager for Linux. It provides aggressive parallelization capabilities, uses socket and D-Bus activation for starting services, offers on-demand starting of daemons, keeps track of processes using Linux control groups, maintains mount and automount points and implements an elaborate transactional dependency-based service control logic.
-
Configure machine-id and divert
dbus-uuidgen > /etc/machine-id

ln -fs /etc/machine-id /var/lib/dbus/machine-id
The
/etc/machine-idfile contains the unique machine ID of the local system that is set during installation or boot. The machine ID is a single newline-terminated, hexadecimal, 32-character, lowercase ID. When decoded from hexadecimal, this corresponds to a 16-byte/128-bit value. This ID may not be all zeros.dpkg-divert --local --rename --add /sbin/initctl ln -s /bin/true /sbin/initctldpkg-divert is the utility used to set up and update the list of diversions.
-
Upgrade packages
apt-get -y upgrade -
Install packages needed for Live System
apt-get install -y \
   sudo \
   ubuntu-standard \
   casper \
   lupin-casper \
   discover \
   laptop-detect \
   os-prober \
   network-manager \
   resolvconf \
   net-tools \
   wireless-tools \
   wpagui \
   locales \
   grub-common \
   grub-gfxpayload-lists \
   grub-pc \
   grub-pc-bin \
   grub2-common \
   grub-efi-amd64-signed \
   shim-signed \
   binutils
apt-get install -y --no-install-recommends linux-generic -
Graphical installer
apt-get install -y \
   ubiquity \
   ubiquity-casper \
   ubiquity-frontend-gtk \
   ubiquity-slideshow-ubuntu \
   ubiquity-ubuntu-artwork
The next steps will appear, as a result of the packages that will be installed from the previous step, this will happen without anything having to be informed or executed.
- Configure keyboard

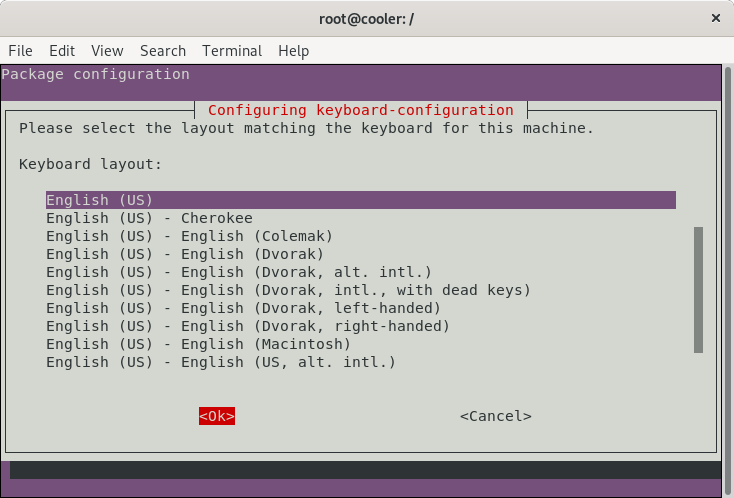
- Console setup

-
Install window manager
apt-get install -y \ plymouth-theme-ubuntu-logo \ ubuntu-gnome-desktop \ ubuntu-gnome-wallpapers -
Install useful applications
apt-get install -y \ clamav-daemon \ terminator \ apt-transport-https \ curl \ vim \ nano \ less -
Install Visual Studio Code (optional)
-
Download and install the key
curl https://packages.microsoft.com/keys/microsoft.asc | gpg --dearmor > microsoft.gpg install -o root -g root -m 644 microsoft.gpg /etc/apt/trusted.gpg.d/ echo "deb [arch=amd64] https://packages.microsoft.com/repos/vscode stable main" > /etc/apt/sources.list.d/vscode.list rm microsoft.gpg -
Then update the package cache and install the package using
apt-get update

apt-get install -y code
-
-
Install Google Chrome (optional)
-
Download and install the key
wget -q -O - https://dl-ssl.google.com/linux/linux_signing_key.pub | sudo apt-key add - echo "deb http://dl.google.com/linux/chrome/deb/ stable main" > /etc/apt/sources.list.d/google-chrome.list -
Then update the package cache and install the package using
apt-get update

apt-get install google-chrome-stable
-
-
Install Java JDK 8 (optional)
apt-get install -y \ openjdk-8-jdk \ openjdk-8-jre -
Remove unused applications (optional)
apt-get purge -y \ transmission-gtk \ transmission-common \ gnome-mahjongg \ gnome-mines \ gnome-sudoku \ aisleriot \ hitori -
Remove unused packages
apt-get autoremove -y -
Reconfigure packages
-
Generate locales
dpkg-reconfigure locales-
Select locales

-
Select default locale

-
-
Reconfigure resolvconf
dpkg-reconfigure resolvconf-
Confirm changes


-
-
Configure network-manager
cat <<EOF > /etc/NetworkManager/NetworkManager.conf [main] rc-manager=resolvconf plugins=ifupdown,keyfile dns=dnsmasq [ifupdown] managed=false EOF -
Reconfigure network-manager
dpkg-reconfigure network-manager
-


Create the CD image directory and populate it
We are now back in our build environment after setting up our live system and will continue creating files necessary to generate the ISO.
-
Create directories
mkdir -p /image/{casper,isolinux,install} -
Copy kernel images
cp /boot/vmlinuz-**-**-generic image/casper/vmlinuz cp /boot/initrd.img-**-**-generic image/casper/initrd -
Copy memtest86+ binary (BIOS)
cp /boot/memtest86+.bin image/install/memtest86+ -
Download and extract memtest86 binary (UEFI)
wget --progress=dot https://www.memtest86.com/downloads/memtest86-usb.zip -O image/install/memtest86-usb.zip

unzip -p image/install/memtest86-usb.zip memtest86-usb.img > image/install/memtest86

rm -f image/install/memtest86-usb.zip
GRUB menu configuration
-
Create base point access file for grub
touch image/ubuntu -
Create image/isolinux/grub.cfg
cat <<EOF > image/isolinux/grub.cfg

search --set=root --file /ubuntu

insmod all_video

set default="0"
set timeout=30

menuentry "Try Ubuntu FS without installing" {
   linux /casper/vmlinuz boot=casper nopersistent toram quiet splash ---
   initrd /casper/initrd
}

menuentry "Install Ubuntu FS" {
   linux /casper/vmlinuz boot=casper only-ubiquity quiet splash ---
   initrd /casper/initrd
}

menuentry "Check disc for defects" {
   linux /casper/vmlinuz boot=casper integrity-check quiet splash ---
   initrd /casper/initrd
}

menuentry "Test memory Memtest86+ (BIOS)" {
   linux16 /install/memtest86+
}

menuentry "Test memory Memtest86 (UEFI, long load time)" {
   insmod part_gpt
   insmod search_fs_uuid
   insmod chain
   loopback loop /install/memtest86
   chainloader (loop,gpt1)/efi/boot/BOOTX64.efi
}
EOF
Create manifest
Next we create a file filesystem.manifest to specify each package and it's version that is installed on the live system. We create another file filesystem.manifest-desktop which specifies which files will be installed on the target system. Once the Ubiquity installer completes, it will
remove packages specified in filesystem.manifest that are not listed in filesystem.manifest-desktop.
-
Generate manifest
dpkg-query -W --showformat='${Package} ${Version}\n' | sudo tee /image/casper/filesystem.manifest

cp -v /image/casper/filesystem.manifest image/casper/filesystem.manifest-desktop

sed -i '/ubiquity/d' /image/casper/filesystem.manifest-desktop

sed -i '/casper/d' /image/casper/filesystem.manifest-desktop

sed -i '/discover/d' /image/casper/filesystem.manifest-desktop

sed -i '/laptop-detect/d' /image/casper/filesystem.manifest-desktop

sed -i '/os-prober/d' /image/casper/filesystem.manifest-desktop
Create diskdefines
README file often found on Linux LiveCD installer discs, such as an Ubuntu Linux installation CD; typically named “README.diskdefines” and may be referenced during installation.
-
Create file /image/README.diskdefines
cat <<EOF > /image/README.diskdefines
#define DISKNAME  Ubuntu from scratch
#define TYPE  binary
#define TYPEbinary  1
#define ARCH  amd64
#define ARCHamd64  1
#define DISKNUM  1
#define DISKNUM1  1
#define TOTALNUM  0
#define TOTALNUM0  1
EOF
Creating the certificates to Secure Boot
-
Create the certificate template
mkdir /certificatescd /certificatescat <<EOF > config.conf [ req ] default_bits = 2048 default_md = sha256 distinguished_name = dn prompt = no [ dn ] C = BR ST = SP L = Campinas O = Scratch, Labs OU = Labs CN = \${ENV::CN} [ root ] basicConstraints = critical,CA:TRUE subjectKeyIdentifier = hash authorityKeyIdentifier = keyid:always,issuer keyUsage = critical,digitalSignature,keyEncipherment,keyCertSign,cRLSign [ ca ] basicConstraints = critical,CA:TRUE,pathlen:0 subjectKeyIdentifier = hash authorityKeyIdentifier = keyid:always,issuer:always keyUsage = critical,digitalSignature,keyEncipherment,keyCertSign,cRLSign [ db ] subjectKeyIdentifier = hash basicConstraints = critical,CA:FALSE keyUsage = critical,keyEncipherment,dataEncipherment authorityKeyIdentifier = keyid,issuer:always EOF -
Create the Root CA certificate
CN="Root, CA" \ openssl req -x509 -newkey rsa:2048 -nodes \ -keyout root.key \ -days 3650 \ -config config.conf \ -extensions root \ -out root.pem -
Create the intermediate CA certificate
CN="Ubuntu live from scratch, CA" \ openssl req -newkey rsa:2048 -nodes \ -keyout ca.key \ -config config.conf \ -out ca.pem -
Create Database (DB) request certificate
CN="Ubuntu live from scratch, Database" \ openssl req -newkey rsa:2048 -nodes \ -keyout db.key \ -config config.conf \ -out db.pem -
Sign the intermediate CA certificate with the Root CA certificate
CN="Ubuntu live from scratch, CA" \ openssl x509 -req \ -extfile config.conf \ -extensions ca \ -in ca.pem \ -CA root.pem \ -CAkey root.key \ -CAcreateserial \ -out ca.pem \ -days 3650 -sha256 -
Sign Database (DB) certificate using your own CA
CN="Ubuntu live from scratch, Database" \ openssl x509 -req \ -extfile config.conf \ -extensions db \ -in db.pem \ -CA ca.pem \ -CAkey ca.key \ -CAcreateserial \ -out db.pem \ -days 3650 -sha256 -
Create the intermediate CA certificate chain
cat ca.pem root.pem > ca-chain.pem -
Verify the signatures
openssl verify -CAfile ca-chain.pem db.pem -
Create DER version of our public key (CA)
openssl x509 -outform DER -in ca.pem -out ca.cer
Creating image
-
Access image directory
cd /image -
Create SBAT file
cat <<EOF > isolinux/sbat.csv sbat,1,SBAT Version,sbat,1,https://github.com/rhboot/shim/blob/main/SBAT.md grub,1,Free Software Foundation,grub,2.04,https://www.gnu.org/software/grub/ EOF -
Create a grub UEFI image
grub-mkstandalone \ --format=x86_64-efi \ --output=isolinux/grubx64.efi \ --locales="" \ --fonts="" \ "boot/grub/grub.cfg=isolinux/grub.cfg"- Fix Secure Boot Grub
sed -i 's/SecureBoot/SecureB00t/' isolinux/grubx64.efi -
Add .sbat sections
objcopy --set-section-alignment '.sbat=512' --add-section .sbat=isolinux/sbat.csv isolinux/grubx64.efi --adjust-section-vma .sbat+10000000 -
UEFI secure boot signing
sbsign --key /certificates/db.key --cert /certificates/db.pem --output isolinux/grubx64.efi isolinux/grubx64.efi -
Create a FAT16 UEFI boot disk image containing the EFI bootloader
( cd isolinux && \ dd if=/dev/zero of=efiboot.img bs=1M count=10 && \ mkfs.vfat -F 16 efiboot.img && \ LC_CTYPE=C mmd -i efiboot.img certificates efi efi/boot && \ LC_CTYPE=C mcopy -i efiboot.img /usr/lib/shim/shimx64.efi.signed.previous ::efi/boot/bootx64.efi && \ LC_CTYPE=C mcopy -i efiboot.img /usr/lib/shim/mmx64.efi ::efi/boot/mmx64.efi && \ LC_CTYPE=C mcopy -i efiboot.img /image/isolinux/grubx64.efi ::efi/boot/grubx64.efi && \ LC_CTYPE=C mcopy -i efiboot.img /certificates/ca.cer ::certificates/ ) -
Create a grub BIOS image
grub-mkstandalone \ --format=i386-pc \ --output=isolinux/core.img \ --install-modules="linux16 linux normal iso9660 biosdisk memdisk search tar ls" \ --modules="linux16 linux normal iso9660 biosdisk search" \ --locales="" \ --fonts="" \ "boot/grub/grub.cfg=isolinux/grub.cfg" -
Combine a bootable Grub cdboot.img
cat /usr/lib/grub/i386-pc/cdboot.img isolinux/core.img > isolinux/bios.img -
Generate md5sum.txt
/bin/bash -c "(find . -type f -print0 | xargs -0 md5sum | grep -v -e 'md5sum.txt' -e 'bios.img' -e 'efiboot.img' > md5sum.txt)"
Cleanup the chroot environment
-
If you installed software, be sure to run
truncate -s 0 /etc/machine-id -
Remove the diversion
rm /sbin/initctl dpkg-divert --rename --remove /sbin/initctl -
Clean up
apt-get clean

rm -rf /tmp/* ~/.bash_history

umount /proc

umount /sys

umount /dev/pts

export HISTSIZE=0

exit
Unbind mount points
sudo umount $HOME/live-ubuntu-from-scratch/chroot/dev

sudo umount $HOME/live-ubuntu-from-scratch/chroot/run
Compress the chroot
After everything has been installed and preconfigured in the chrooted environment, we need to generate an image of everything that was done by following the next steps in the build environment.
-
Access build directory
cd $HOME/live-ubuntu-from-scratch -
Move image artifacts
sudo mv chroot/{image,certificates} . -
Create squashfs
sudo mksquashfs chroot image/casper/filesystem.squashfsSquashfs is a highly compressed read-only filesystem for Linux. It uses zlib compression to compress both files, inodes and directories. Inodes in the system are very small and all blocks are packed to minimize data overhead. Block sizes greater than 4K are supported up to a maximum of 64K. Squashfs is intended for general read-only filesystem use, for archival use (i.e. in cases where a .tar.gz file may be used), and in constrained block device/memory systems (e.g. embedded systems) where low overhead is needed.
-
Write the filesystem.size
printf $(sudo du -sx --block-size=1 chroot | cut -f1) | sudo tee image/casper/filesystem.size
Create ISO Image for a LiveCD (BIOS + UEFI + Secure Boot)
-
Access build directory
cd $HOME/live-ubuntu-from-scratch/image -
Create iso from the image directory using the command-line
sudo xorriso \
   -as mkisofs \
   -iso-level 3 \
   -full-iso9660-filenames \
   -volid "Ubuntu from scratch" \
   -output "../ubuntu-from-scratch.iso" \
   -eltorito-boot boot/grub/bios.img \
      -no-emul-boot \
      -boot-load-size 4 \
      -boot-info-table \
      --eltorito-catalog boot/grub/boot.cat \
      --grub2-boot-info \
      --grub2-mbr ../chroot/usr/lib/grub/i386-pc/boot_hybrid.img \
   -eltorito-alt-boot \
      -e EFI/efiboot.img \
      -no-emul-boot \
   -append_partition 2 0xef isolinux/efiboot.img \
   -m "isolinux/efiboot.img" \
   -m "isolinux/bios.img" \
   -graft-points \
      "/EFI/efiboot.img=isolinux/efiboot.img" \
      "/boot/grub/bios.img=isolinux/bios.img" \
      "."
Alternative way, if previous one fails, create an Hybrid ISO
-
Create a ISOLINUX (syslinux) boot menu
cat <<EOF> isolinux/isolinux.cfg UI vesamenu.c32 MENU TITLE Boot Menu DEFAULT linux TIMEOUT 600 MENU RESOLUTION 640 480 MENU COLOR border 30;44 #40ffffff #a0000000 std MENU COLOR title 1;36;44 #9033ccff #a0000000 std MENU COLOR sel 7;37;40 #e0ffffff #20ffffff all MENU COLOR unsel 37;44 #50ffffff #a0000000 std MENU COLOR help 37;40 #c0ffffff #a0000000 std MENU COLOR timeout_msg 37;40 #80ffffff #00000000 std MENU COLOR timeout 1;37;40 #c0ffffff #00000000 std MENU COLOR msg07 37;40 #90ffffff #a0000000 std MENU COLOR tabmsg 31;40 #30ffffff #00000000 std LABEL linux MENU LABEL Try Ubuntu FS MENU DEFAULT KERNEL /casper/vmlinuz APPEND initrd=/casper/initrd boot=casper LABEL linux MENU LABEL Try Ubuntu FS (nomodeset) MENU DEFAULT KERNEL /casper/vmlinuz APPEND initrd=/casper/initrd boot=casper nomodeset EOF -
Include syslinux bios modules
apt install -y syslinux-common && \ cp /usr/lib/ISOLINUX/isolinux.bin isolinux/ && \ cp /usr/lib/syslinux/modules/bios/* isolinux/ -
Create iso from the image directory
sudo xorriso \
   -as mkisofs \
   -iso-level 3 \
   -full-iso9660-filenames \
   -volid "Ubuntu from scratch" \
   -output "../ubuntu-from-scratch.iso" \
 -isohybrid-mbr /usr/lib/ISOLINUX/isohdpfx.bin \
 -eltorito-boot \
     isolinux/isolinux.bin \
     -no-emul-boot \
     -boot-load-size 4 \
     -boot-info-table \
     --eltorito-catalog isolinux/isolinux.cat \
 -eltorito-alt-boot \
     -e /EFI/boot/efiboot.img \
     -no-emul-boot \
     -isohybrid-gpt-basdat \
 -append_partition 2 0xef EFI/boot/efiboot.img \
   "$HOME/live-ubuntu-from-scratch/image"
Make a bootable USB image
It is simple and easy, using "dd"
sudo dd if=ubuntu-from-scratch.iso of=<device> status=progress oflag=sync
Summary
This completes the process of creating a live Ubuntu installer from scratch. The generated ISO may be tested in a virtual machine such as VirtualBox or written to media and booted from a standard PC.
Contributing
Please read CONTRIBUTING.md for details on our code of conduct, and the process for submitting pull requests to us.
Versioning
We use GitHub for versioning. For the versions available, see the tags on this repository.
License
This project is licensed under the GNU GENERAL PUBLIC LICENSE - see the LICENSE file for details